Semester II
New semester.
New season.
New challenges.
New assignments.
New lecturers.
But God is greater than all these. :)
New season.
New challenges.
New assignments.
New lecturers.
But God is greater than all these. :)
God bless,
Laryssa
Assignment 3: Poster
Assignment 1: Checked!
Assignment 2: Checked!
Assignment 3: Checked!
Yay! It has finally come to the end of the semester and we will be submitting our final assignment first thing tomorrow. Many thanks to you again, Mr Jeffrey Patrick! :)
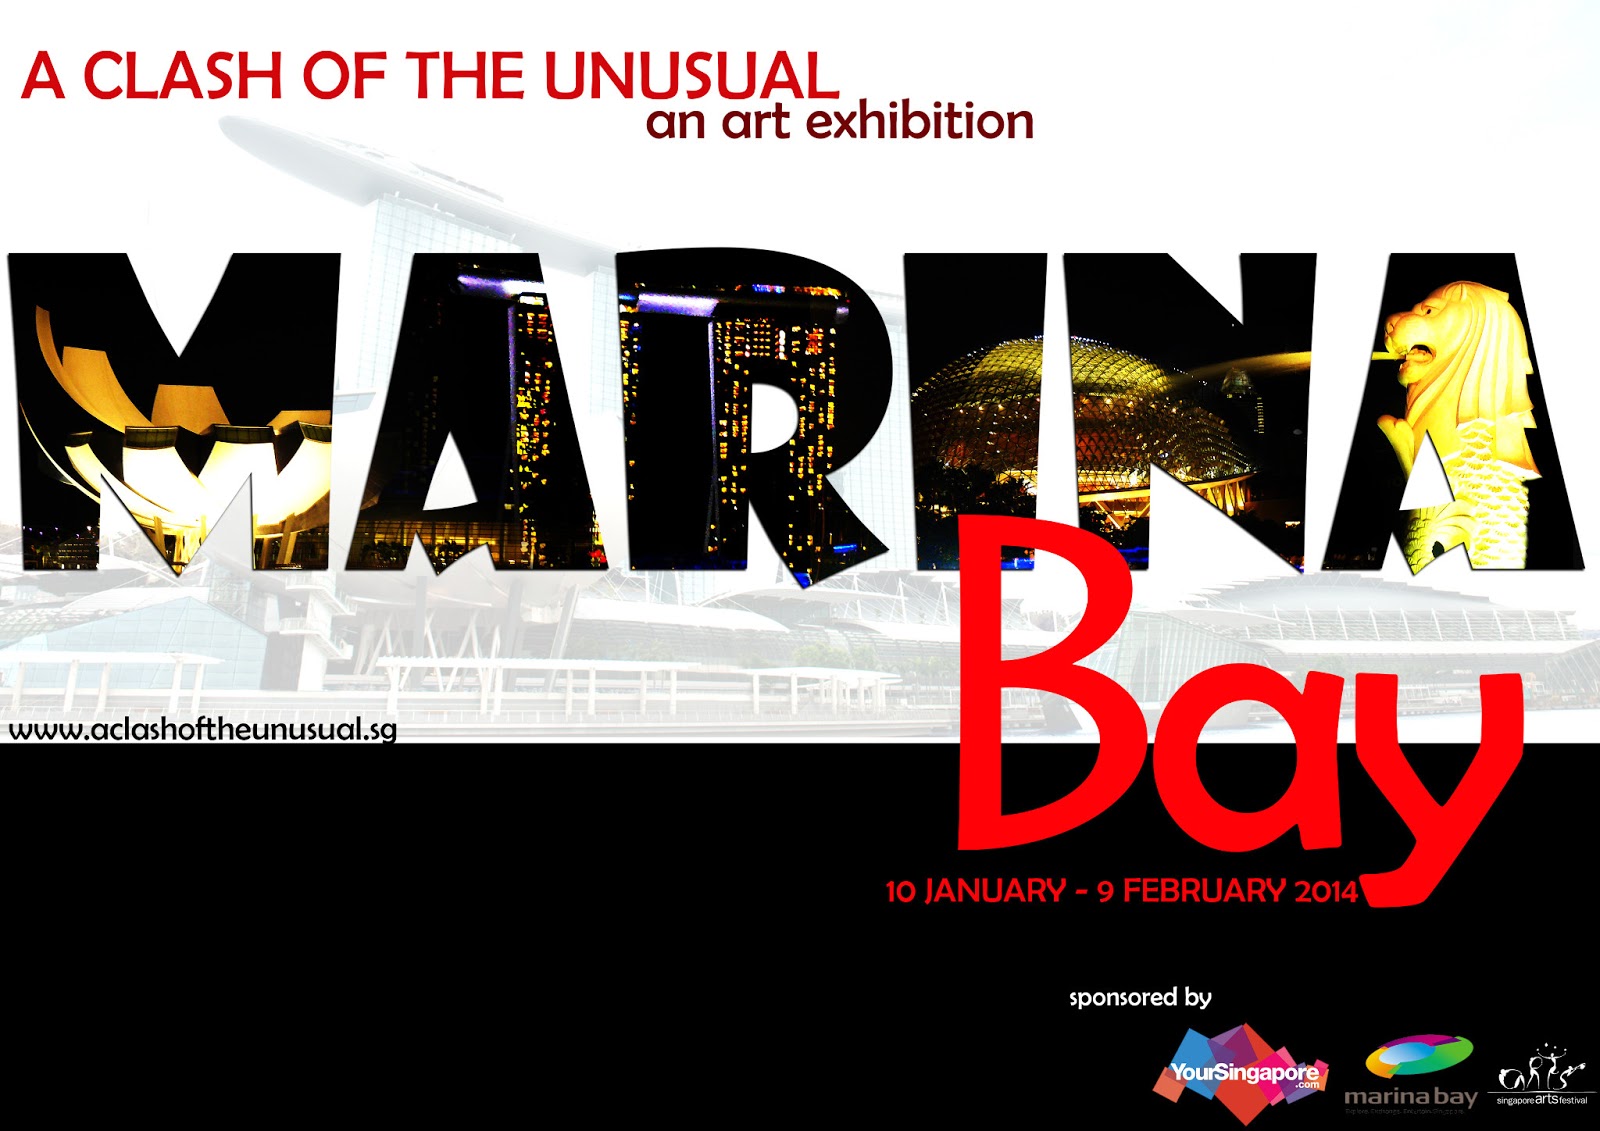
A Clash of the Unusual: An Art Exhibition
After importing all the photos required, I edited them by adjusting the Brightness/Contrast & Opacity, erasing (with Masking) wherever necessary, and resizing the images accordingly (using Free Transform Tool).
As for the image in text, it's created using the following simple steps:
1: Open A Photo To Place Inside Your Text
2: Duplicate The Background Layer (Layer 1)
3: Add A New Blank Layer Between The Two Layers
4: Fill The New Layer With White
5: Select “Layer 1″ In The Layers Palette
6: Select The Type Tool
7: Choose A Font In The Options Bar
8: Set White As Your Foreground Color
9: Add Your Text
10: Resize and Reposition The Text With The Free Transform Command
13: Create A Clipping Mask
14: Add A Drop Shadow
Anddd woolaa! You've gotten what you need. :)
Assignment 2: Checked!
Assignment 3: Checked!
Yay! It has finally come to the end of the semester and we will be submitting our final assignment first thing tomorrow. Many thanks to you again, Mr Jeffrey Patrick! :)
A Clash of the Unusual: An Art Exhibition
 |
| Testing different backgrounds |
 |
| Final work |
After importing all the photos required, I edited them by adjusting the Brightness/Contrast & Opacity, erasing (with Masking) wherever necessary, and resizing the images accordingly (using Free Transform Tool).
 | |
| The image that I've used as the background for the word MARINA. Not very nice and neat here but it looks okay in the text. :) |
1: Open A Photo To Place Inside Your Text
2: Duplicate The Background Layer (Layer 1)
3: Add A New Blank Layer Between The Two Layers
4: Fill The New Layer With White
5: Select “Layer 1″ In The Layers Palette
6: Select The Type Tool
7: Choose A Font In The Options Bar
8: Set White As Your Foreground Color
9: Add Your Text
10: Resize and Reposition The Text With The Free Transform Command
11: Drag The Text Layer Below “Layer 1″
12: Select “Layer 1″ Again13: Create A Clipping Mask
14: Add A Drop Shadow
Anddd woolaa! You've gotten what you need. :)
God bless,
Laryssa
Assignment 2: Text Protrait of Someone You Respect
Juwita Suwito
A multi-talented local artist.
This is the song that introduced me to her.
Her text protrait:

Procedures:
1. Type the word using Horizontal Type Tool.
2. Rasterise - Type the word and then Transform - Warp it.
3. Adjust the word to fit into its respective space.
4. Repeat Step 1 - 3.
5. If the word becomes blurred after warping, Select the word > Ctrl+Shift+Inverse (I) > Delete > Deselect.
6. The colours of the words on the lips are predetermined before rasterising them.
7. Use Freeform Pen Tool to trace the outlines, create shape and fill the shape of the microphone. The shapes and lines can be adjusted using Direct Selection Tool.
Candidly speaking, I regretted not being able to make it more aesthetically due to several human and technical errors. I've learned my lesson. :'(
Lesson learned:
1. Make sure the size of the image is of required.
2. Save a copy of your work after several steps before continuing.
God bless,
Laryssa
Assignment 1: Week 8 - 10 (Free Topics)
The descriptions of the techniques used are very brief because they are all similar to the ones explained in the previous posts. Be flexible with the things you have learned yo!
Cookie Monster
Onomm nomm nomm... Cookies!

The background is created using Filters whereas the Cookie Monster and the word bubble are drawn using Free Pen Tool. The word "COOKIES" is written using Horizontal Type Tool, then rasterised before using Free Transform Tool to adjust the angle.
City of Rock n' Roll

The background colour is filled using Paint Bucket Tool. The outlines of the buildings are drawn using Freeform Pen Tool. The words are form using Horizontal Type Tool > Rasterise - Type > Transform - Warp.
Strawberry Tongue
I know this is very ewwwwwwwww... But please bear with me through this last one.

Images of the tongue and the strawberry are gathered. Adjustment - Desaturate the tongue and save it as a displacement psd file. Reopen the original file. Distort - Displace the strawberry using the displacement psd file saved earlier. Adjust the horizontal and vertical scale accordingly. Erase the unwanted areas of the strawberry image using Brush Tool after applying Masking.
God bless,
Laryssa
Assignment 1: Week 7
A Picture Speaks A Thousand Words
When it is written all over your face...

Procedures:
1. Type the word using Horizontal Type Tool.
2. Rasterize - Type the word then Transform - Warp it.
3. Adjust the word to fit into the space available.
4. Repeat Step 1 - 3.
5. If the word becomes blurred after warping, Select the word > Ctrl+Shift+Inverse (I) > Delete > Deselect.
Special note: Choose the right colour combinations to complement the background colour.
God bless,
Laryssa
Assignment 1: Week 6
Displacement
Flag:
Before:
After:

Procedures:
1. Adjustment - Desaturate the cloth layer and save it as a displacement psd file. Reopen the original file.
2. Distort - Displace the flag using the displacement psd file saved earlier. Adjust the horizontal and vertical scale accordingly.
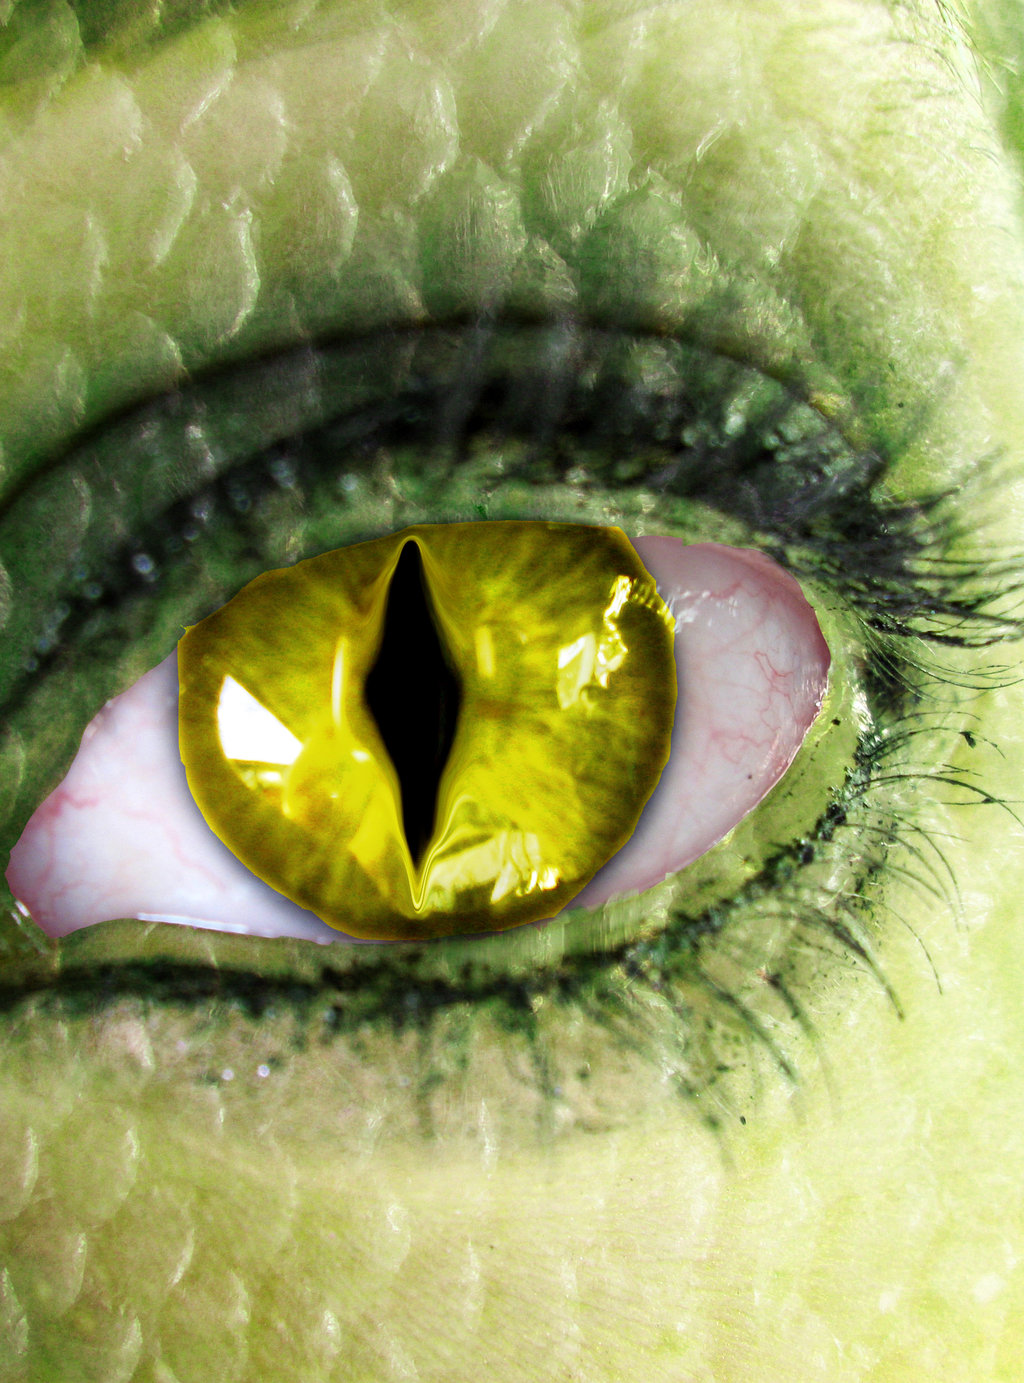
Portrait
Before:


After:

Procedures:
1. Adjustment - Desaturate the man layer and save it as a displacement psd file. Reopen the original file.
2. Distort - Displace the snake texture layer using the displacement psd file saved earlier. Adjust the horizontal and vertical scale accordingly.
3. Apply Gaussian Blur to the snake texture. Apply Burn Tool to the touch up the image further.
4. Cut and Paste the snake eye onto the man's eyes. Adjust using Free Tranform Tool.
5. Colour the lips using Brush Tool. Adjust the opacity of the brush accordingly.
God bless,
Flag:
Before:
 |
| Flag |
 |
| Cloth |
Procedures:
1. Adjustment - Desaturate the cloth layer and save it as a displacement psd file. Reopen the original file.
2. Distort - Displace the flag using the displacement psd file saved earlier. Adjust the horizontal and vertical scale accordingly.
Portrait
Before:


After:

Procedures:
1. Adjustment - Desaturate the man layer and save it as a displacement psd file. Reopen the original file.
2. Distort - Displace the snake texture layer using the displacement psd file saved earlier. Adjust the horizontal and vertical scale accordingly.
3. Apply Gaussian Blur to the snake texture. Apply Burn Tool to the touch up the image further.
4. Cut and Paste the snake eye onto the man's eyes. Adjust using Free Tranform Tool.
5. Colour the lips using Brush Tool. Adjust the opacity of the brush accordingly.
God bless,
Laryssa
Assignment 1: Week 5
Tracing
Wow I really love this technique!
It allows me to "cartoonise" pictures according to my own interest. :3
Original:

First Attempt:

Final Attempt:

Procedures:
1. Use Freeform Pen Tool to trace the outlines, create shape and fill the shape. The shapes and lines can be adjusted using Direct Selection Tool.
2. Create a new layer. Form the background with straight lines using Rectangle Tool, experiment with your own colour combinations.
3. Make the straight lines circular using Distort - Polar Coordinates.
4. Change the texture further by selecting on the Distort - Twirl.
5. Use Gradient Tool to adjust the colour gradient. In fact, you can use any of effects in Filters according to your own preference.
6. Use Brush Tool to create the blush on the cheek and also the shadow on the neck and forehead area by adjusting the opacity of the brush.
Textures

Textures can be created by playing with colours & the different effects in Filters coupled with several other layers with different textures. In this case, I have used 3 layers in total, with effects such as Render - Difference Cloud, Distort - Zigzag, Distort - Twirl, Blur - Gaussian Blur, Distort - Wave, and also some of the other effects in Smart Filters.
God bless,
Laryssa
Assignment 1: Week 4
Houses in Different Settings
Original images:


In this week, we were required to mix and match two or more images to create 3 new images which including one haunted house. Lol!
Below are the ones that I have come out with. Spot the differences, peeps! :D

Procedures:
1. Copy and Paste the images of the ghost and the house onto the midnight background.
2. Rescale, relocate then apply Masking to the image of the house and erase unwanted areas.
3. Apply Match Colour to the house image and adjust its brightness/contrast. Apply Gaussian Blur whenever necessary.
4. Adjust the size and direction of the ghost using Free Transform Tool. Relocate.
5. Apply Screening effect and adjust the opacity of the ghost image.
6. Use Gradient Tool to achieve the shimmering effect of the ghost.

Procedures:
1. Cut and Paste the image of the sky onto the image of the house. Disable the sky image.
2. Deselect the original sky in the house image using Colour Range and Lasso Tool. Enable the sky image.
3. Expand the sky image before apply Match Colour and Gaussian Blur to it.
4. Adjust the Brightness/Contrast of the image.

Procedures:
1. Copy and Paste the image of the house and Rescale it to fit on the island.
2. Apply Match Colour to the house.
3. Clone the reflection of the house on the water surface using Stamping Tool.
God bless,
Laryssa
Assignment 1: Week 3
Girl on Fire
She looks as if she is in pain. Ouch!

Similar techniques as shown in the previous post are used to achieve the burning hair effect.
Procedures:
1. Select, copy and paste the image of the fire on to the image of the girl.
2. Duplicate the image as many times as needed and resize it using Free Transform Tool.
3. Arrange the images to cover the hair.
4. Disable the images upon finishing Step 3.
5. Select the girl using either Magic Wand Tool or Colour Range (this will deselect most of the blue sky automatically).
6. Proceed to select the areas other than the hair using Lasso Tool.
7. Enable and Screen all the fire images, and adjust their opacity accordingly.
8. Apply Gaussian Blur to the fire images so that they blend with the girl's image better.
I must confess, this image is quite poorly done. It can be improved further by making the images of the fire smaller and by blurring the images more in order for them to blend better.
God bless,
Laryssa
Assignment 1: Week 2
Cloning
STAMP! STAMP! STAMP! It's the Stamping Tool! :D
Clone IN:
Before:

After:

Clone OUT:
Before:

After:

For both Clone In & Clone Out, a simple Stamping Tool does all the tricks!
Procedures:
1. After selecting the Stamping Tool, hold on to the Alt key and click on the area you wish to clone.
2. Click on the area you want to stamp on without holding on to the Alt key.
3. Repeat Steps 1 & 2 until you have achieved desired results.
PERSPECTIVE Cloning:
Before:

After:

Cloning involving perspective requires a few more steps than the others.
Procedures:
1. Create a frame according to the perspective using Vanishing Point - Create Plan Tool.
2. Duplicate the train using Stamp Tool or Cut and Paste the train directly on the plane by dragging the image to the appropriate location.
3. Touch up the front part of the duplicated train using Stamp Tool.
God bless,
Laryssa
Assignment 1: Week 1
I would like to show my appreciation to my instructor, Mr. Jeffrey Patrick, who has dedicated his time and efforts in teaching and guiding us throughout this semester. Thank you, Sir.
Digital Imaging is an elective subject which aims to equip us with the necessary skills and techniques in using Photoshop. Following are the images that I have edited/done using Adobe Photoshop CS6, backed with some brief descriptions of the techniques used.
Hearst Mansion
In the first week of the class, we learned how to crop a portion of a photo to be pasted on another photo, and to make it looks more actual. If you need a photo of you being somewhere you have not been before, this is the basics that you'll have to learn. Of course, you can do so much more with these skills.
The original photos:
Procedures:
1. Select the area needed (myself) in Photo 2 using Marquee Tool.
2. Cut and paste the selected area on Photo 1.
3. Resize the image pasted using Free Transform Tool. Hold on the Shift key to scale the image proportionally. Adjust the image to your desirable position in Photo 1.
4. Erase the unwanted area of the image using Brush Tool after adding Masking to the layer.
5. Duplicate the layer twice, transform and resize them to become a shadow and a reflection respectively.
6. Darken the images by adjusting the brightness/contrast.
7. Blend the colour using Match Colour.
WOOLAAA!
The end product:
Digital Imaging is an elective subject which aims to equip us with the necessary skills and techniques in using Photoshop. Following are the images that I have edited/done using Adobe Photoshop CS6, backed with some brief descriptions of the techniques used.
Hearst Mansion
In the first week of the class, we learned how to crop a portion of a photo to be pasted on another photo, and to make it looks more actual. If you need a photo of you being somewhere you have not been before, this is the basics that you'll have to learn. Of course, you can do so much more with these skills.
The original photos:
 |
| Photo 1: Hearst Mansion |
 |
| Photo 2: My friend and I |
1. Select the area needed (myself) in Photo 2 using Marquee Tool.
2. Cut and paste the selected area on Photo 1.
3. Resize the image pasted using Free Transform Tool. Hold on the Shift key to scale the image proportionally. Adjust the image to your desirable position in Photo 1.
4. Erase the unwanted area of the image using Brush Tool after adding Masking to the layer.
5. Duplicate the layer twice, transform and resize them to become a shadow and a reflection respectively.
6. Darken the images by adjusting the brightness/contrast.
7. Blend the colour using Match Colour.
WOOLAAA!
The end product:
 |
| I've been to the Hearst Mansion already! :P |
God bless,
Laryssa
Out of Courtesy
Dear Readers,
Greetings!
I am a first year, first semester designer-in-training (at the time this post is written). Hence, the chief purpose of this blog will be to showcase my designs and also some of the things that I have produced throughout my years of study.
The title of this blog - Limitless is because I strongly believe that there is no limit to our creativity and ability. Believe and you are already halfway there. Everything is possible! :)
Thank you.
God bless,
Ling Kee Hung (Laryssa)
BA (Hons) Interior Architecture
Taylor's University, Malaysia
Greetings!
I am a first year, first semester designer-in-training (at the time this post is written). Hence, the chief purpose of this blog will be to showcase my designs and also some of the things that I have produced throughout my years of study.
The title of this blog - Limitless is because I strongly believe that there is no limit to our creativity and ability. Believe and you are already halfway there. Everything is possible! :)
Be amused.
If not, please leave your constructive remarks.
Your time spent browsing through this blog is very much appreciated.
Thank you.
God bless,
Ling Kee Hung (Laryssa)
BA (Hons) Interior Architecture
Taylor's University, Malaysia
Subscribe to:
Posts (Atom)